Feel free to ask questions. I'll do my best to answer.


Wednesday, December 29, 2010

A little more into boundary conditions

The Front wall, side ipsilateral wall, and floor will all cause big issues with your frequency response that will be audible d/t the ear's increased integration time as frequency goes lower.  In other words, we don't hear with the greatest time resolution at low frequencies so we'll hear the reflections as part of the source.  This is why I like wavelets--but that's been touched on earlier in the DTM Blog.  The contralateral wall, ceiling, and possibly even the rear wall will also come into play and more so in a small room I imagine.  As the distance of the reflecting surface gets further away from the source, the less pronounced the dip will be thanks to the Inverse Square Law--every time you double the distance, you loose 6dB.  The manner that the side wall reflections effect what we hear is different than they measure--it's more of spatial distortion and it's been shown to be more enveloping/spacious/and broadens the apparent source width.  These qualities have been shown by Dr. Toole and Mr. Klippel to be preferred vs. their absence.

The equation for the front wall interference:
Cancellation notch frequency = [(344m/s) divided by (4 times the distance from the speaker to the wall behind it in meters)]   (344m/s)/4Dm=fHz
picture for reference:
A quick Table for reference:

This equation for other significant boundaries:
notch frequency = [(344m/s) / 2(the distance of speaker to the listening position via the reflecting surface - the direct path distance from the speaker to the listening position)]   (344m/s)/2(Drm-Ddm)

This picture may help with visualization:
floor bounce
A couple more quick reference tables for this SBIR modifier:
                                                 ..................................
For an online calculator (metric) go here:  
http://mehlau.net/audio/floorbounce/
For sidewall reflections:
http://mehlau.net/audio/reflection_sidewall/


So for a practical example:
     We have our speaker on a 3 foot stand.  Its Baffle is 4 feet from the front wall and we are sitting we are sitting 9 feet from it at a listening height of 3 feet.  That gives us enough information to find 2 of our first notches.  The front wall will cause an approximate 70 Hz notch while the floor bounce will be a little over 300Hz.  Keep in mind that the ipsilateral wall will still have its say as will the modes and to a lesser degree the other boundaries.  For the ipsilateral problem it will be necessary to go to mehlau.net for a decent calculation.
___________________________________________________________________________
The previous section was just the the start of
Comb Filtering
The comb filter starts at that first notch frequency related to the SBIR.  If you double that frequency, the interference pattern from the reflected wave is actually additive due to its phase relationship with the original wave.  It is now back in phase and thus you essentially have 2 sources reinforcing each other.  That gives us 6 dB of gain.  This kicks off a pattern of alternation cancellation and reinforcement for multiples of the original notch resembles the teeth of those cheap black plastic combs you all have with the teeth getting progressively closer together as frequency get higher.   It will also become less pronounced with increased frequency d/t narrowing directivity in the MR/Treble. 

Here's the expanded tables from the first section on the effects:
Floor Bounce


Monday, December 27, 2010

Room treatment advice--quick and dirty


Controlling bass is difficult in a small room and likely the #1 priority of room treatment.

In general: for typical box speakers you want to absorb the whole front wall(the one behind the speakers or you depending on the situation) with something thick like 4" thick or so.  The further away from the wall, the better it will absorb lower into the bass range.  Bass trapping the front corners with broadband absorption would go right along with this.  This will reduce Speaker Boundary Interference Response(SBIR), reduce coloration and improve imaging.  The next absorption point would be your first ipsilateral reflection and can be done with 2 inches of absorption material.  4 inches is probably better and space it a few inches off the wall.  If your speaker have good off axis performance, this is optional depending on your desired effect.  That can help reduce high frequency hash and harshness caused by diffraction as well as squash polar anomalies.  That said, unmitigated early horizontal reflections have been shown to be "preferred" in blind tests.  They will increase your apparent source width and can arguably be detrimental to pinpoint imaging.

Then the rear wall with the thick stuff for more bass reduction, but diffusion can be used if your bass is well behaved.  Some people will also recommend absorbing the first reflection from the ceiling--others would say diffuse it.  Diffusion makes sense because the ceiling height is high enough to allow it to work.  The side walls can benefit from diffusion to improve spaciousness and sense of envelopment.  Diffusion has to be thicker than absorption to be effective to as low of a frequency and it can be expensive.  I would generally recommend broadband absorption midway between you and the speaker(or microphone as the case may be) to absorb the floor reflection--like a think foam pseudo-coffee table I use with stand mounted speakers.  Measurements of the coffee table found here.

If building new construction or if you are willing to modify the existing structure, making you walls into resonating diaphragm absorber makes better sense for controlling low frequencies because the areas of highest pressure are right next to the walls. Porous traps reduce particle velocity and best used away from walls for bass frequencies.

I will continue update this when I have time/desire.


Rationale
More Rationale
Further Reading
Boundary Issues

Sunday, December 26, 2010

Above the modal dominated frequencies--300Hz and up

There are basically three types of loudspeakers as far as I'm concerned: ones whose off axis behavior bears little resemblance to on axis, loudspeakers with Wide radiation patterns and ones with narrow radiation patterns.  Most speakers are of the first type and of little use to me for building a listening room, home theater, or mixing/mastering studio since we hear the early reflections as part of the original(to a degree) and not all listeners will likely be in the sweetspot.It would be hard to treat your room to correct for wild sound radiation patterns unless you were to make your room anechoic. There's a belief that you can EQ poor loudspeaker radiation patterns, but you really cannot EQ acoustic problems.  This is an acoustics problem so every problem you "fix" will create another.  Newer software corrections seems to be improving these erratic loudspeaker's perceived behavior.   Let's assume we want to hear the recording and not get into the wild world of mini monitors and unruly loudspeaker radiation patterns and you don't have the latest experimental room correction software.

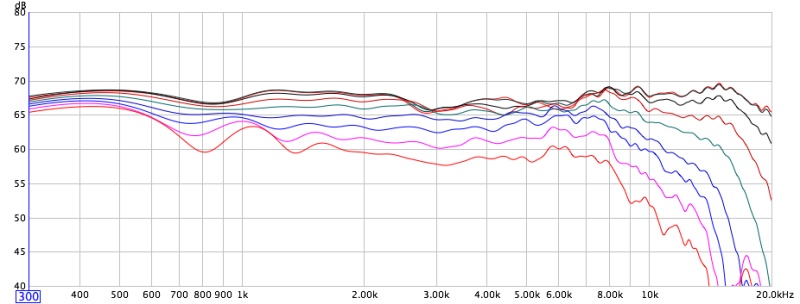
Ok, wide pattern loudspeakers:  above is a Linkwitz Pluto
(  http://www.linkwitzlab.com/Pluto/specs.htm  ) and we have a graph of one right here on the Blog--the Behringer 1030A:

So what sound effects can we expect from this type of speaker in stereo?
Spaciousness, good envelopment (sometimes described as 'liquid sound' or a 'wash of music' on audiophile sites), an improved vertical dispersion compared to narrow directivity, and detail.  The "detail" seems to be a result of the ear getting 'a second look' according to Dr. Floyd Toole's proposal.  The 1030A gave me so much detail, I heard things in recordings that really shouldn't be there and thought the speaker must be broken.  I was wrong as I was later able to hear the same low level flaws on other speakers, just not to the same degree as they were exposed through the wide radiation 1030A.   Some potential negatives from this system of loudspeakers has to do with early reflections that can be loud enough to cause image shift or poor imaging.  I've never heard this as a 'real' problem, but I know others who claim it is.  Source broadening is real and a vague image could be described.  Others might say it fills in spatial gaps...  So is this a problem?  That's up to you and the goal you have in mind. The only time I've ever heard a serious image problem from reflection was with a Martin Logan panel speaker.  Some sounds seemed to be coming from the front wall and the soundscape was essentially a mess.  Imaging was out of the question.  The guy next to me thought this effect was very cool.  Panel speakers fall into my 'not to be discussed' category.  These broad output patterned speakers tend to be small, inefficient, and require a lot of power for high output that they can't comfortably handle.  They also tend to have a wide vertical window which makes them excellent near field monitors and a less abrupt change from omni radiation to wide in the bass to midrange transition compared to narrow pattern speakers.  In theory this could give them an edge in tonal rendition.  The Linkwitz link has a ton of info on setting these speakers up.
.................................................................................................................................
Then narrow directivity made famous by Dr. Geddes and a version of his Summa The graph is displayed above and used to be posted here:
http://www.gedlee.com/summa_.htm
It was removed for more advanced displays and/or perhaps an upgraded design.  I'll post this one for comparison sake and it's similar to my early attempt at loudspeaker design shown below.

Dr. Geddes advocates this type of system for many, pardon the pun, sound reasons--too many for me to go through them all.  Essentially you can crossfire speakers with a tight toe in.  The listening axis would then be off the center of the speaker by around 20 degrees.  This is said and confirmed by my experience to have excellent spaciousness because of the high level of contralateral reflections, good interaural cross correlation, and precise imaging for many listeners.  It reduces the influence of the room and very early reflections which are perceptually significant (these designs do not help most SBIR issues) and ITDG but suffers in near field performance due to large variations in FR with small movements and the narrow vertical and horizontal patterns--refer vertical polar response written earlier in the blog.  THX recommends this type of speaker as does recent work of Princeton: http://www.princeton.edu/3D3A/Directivity.html though for use in a different way.  The problem I had with type of speaker was caused by my particular design.  You can see the ragged treble response and this resulted in some treble harshness.  Graphically Dr. Geddes's speaker doesn't seem to posses this issue.  It's just a better design well executed.  Other things of note is that these speakers--narrow directivity--generally use a powerful, large diameter pro woofer and a waveguided compression tweeter.  These tend to make a big, dynamic, and easy sound that pretty much any amp can drive them to THX reference levels and beyond.  One particular advantage for the Summa is the fact that it maintains its pattern nearly to the region where a room goes modal and essentially becomes part of the source!

The other 2 speakers graphed in detail on this site are somewhere in between as far as directivity is concerned: the Behringer B2031P and the Mackie HR 624 mk2 with the Mackie leaning more toward the narrow.  The B2031P displays some of the off axis nastiness that my design had but less pronounced.  Reverberant rooms will expose this off axis nastiness more than than dead ones and reducing the very early reflections with these speakers is definitely a positive as is adding cotton balls in the ports beside the tweeter.

That's pretty much the basics of above the modal region and it should give you much of the info you need to make a reasoned decision about sound quality and buying a loudspeaker.  I'm sure I will edit and update this in a few days or so.  How much output and power handling will need to be addressed as well, but there is plenty on the web about that and little about this.

Next we go below 300Hz to Mars.
Study on optimum loudspeaker pattern for imaging.
How loudspeaker pattern effects perceived tonality.
Genelec Paper on Diffraction
Some Rationale
More Rationale

Friday, December 24, 2010

Venus and Mars

Essentially somewhere around 200 and 300Hz, something funny happens; the response becomes dominated by the room below those frequencies but remains dominated by the loudspeakers polar response above it.  This is called the Schroeder Frequency.   There are several factors that cause this.  1 is that most loudspeakers are essentially omni at low frequencies and another is that these wavelength are similar in size to the boundaries of the room and the distance to the boundaries from the loudspeaker.  There is no clear cut division d/t the difference in all these factors in each of our rooms.

Tonally what we hear above this region seems to be most dominated by the listening window of the polar response, and below this region it is the ungated measured response of the louspeakers in the room at the listening position.

More to come later,

Dan

Thursday, December 23, 2010

Psychoacoustics

I'm going to try and summarize some basic psychoacoustic phenomenon important for the audio, speaker, home recording or home theater enthusiast. It's hard for me to determine what is important to start with so I guess I'll start with explaining myself a bit. My understanding and writing of this is in no way comprehensive and it's not intended to be so. I just want to make this stuff accessible to those who don't want to read giant books.

So briefly: 1) The Haas Effect, often referred to as the precedence effect, is the principle that the first arriving sound tells the ear where the sound is coming from. Your head takes all those reflections inside roughly 30 milliseconds and integrates them into the original. Even if the delayed sound is up to 10 dB louder, the ear will still integrate it into the original. Reflections after this time period are heard as echoes and within this time period they contribute to the timbre, add spaciousness and a sense of detail to the recorded material.  

That brings me to my next point, 2) a loudspeaker's polar response. If all those early reflections are integrated into the original, shouldn't they be spectrally similar to the original? Sound waves are coming off a loudspeaker in all directions, bouncing off your walls and into your listening space. It certainly seems reasonable for sound reproduction. This may sound like I'm advocating an omnidirectional speaker, but it's not so simple. I would think in the right room and positioning, I'd bet that Mr. Linkwitz's Pluto would be an outstanding speaker. Anyone in the Bay area has one and would let me listen, Just write me! :D

OK, I'll move onto just one more quick point today. I personally want to hear what's on the recording--not some radical distortion of it that may sound good to me on certain songs or whatever and terrible on others, so a flat frequency response is pretty much a must and a smooth off axis set of responses has to be there as well due to Mr. Haas's discovery. If the recording is really bad, your going to need an EQ--you'll need one anyway as I'll discuss later beneath 300 Hz.

Well, that's it for today,


Wednesday, December 22, 2010

Making a Polar Response graph

OK, so how do I make all these polar graph? Good question. (ha ha) No seriously, I have a 4' by 4' piece of plywood that has a huge circle on it. That circle has a line that bisects it every 11.25 degrees. I place a speaker stand with an 2 line bisecting it at 90 degrees like an "X" overtop of the plywood so that one line integrates with the "0" and "180" degree mark and the other line integrates with the "90" and "270" degree mark. Line up the mic with the "0" to "180" degree line, set your level to a sensible range, and take an impulse or FR measurement using whatever method you have available. I use my MacBook, EMU 0404 USB, and a calibrated mic with Room EQ Wizard(A free program available at the Pro Audio Shack known as REW). After taking that "0" degree measurement, turn the speaker/stand to the next mark over and continue until you reach 90 degrees. Of course you can go further........ that's up to you and I encourage it. To manipulate the graphs into something more useful, see my previous post in this blog.

Info on Distance